Tutorial: Using Strap Ends & Strap Keepers

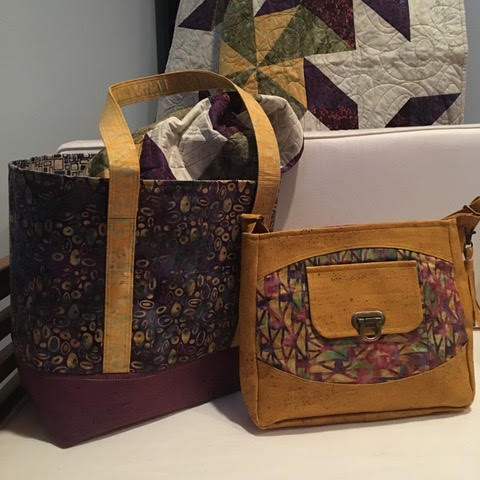
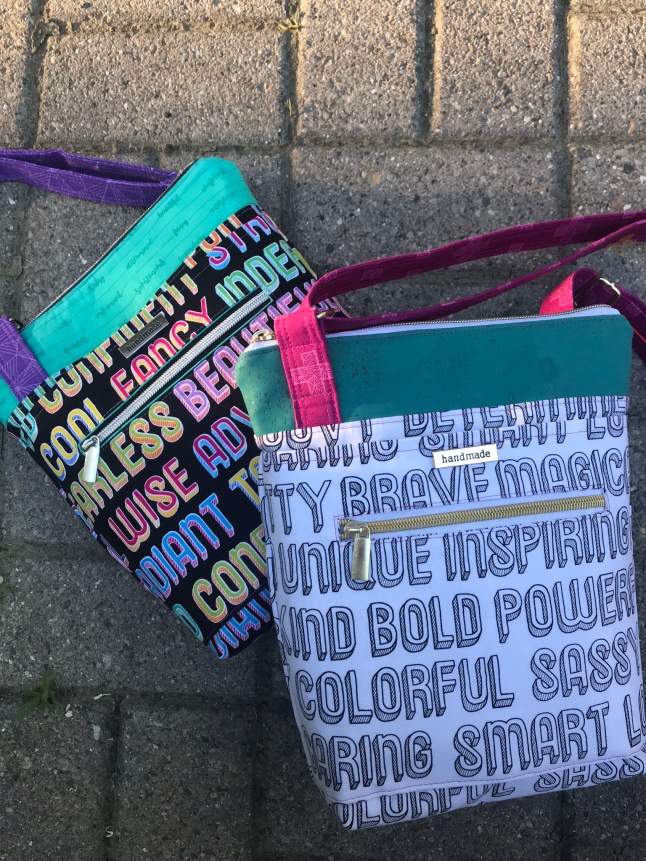
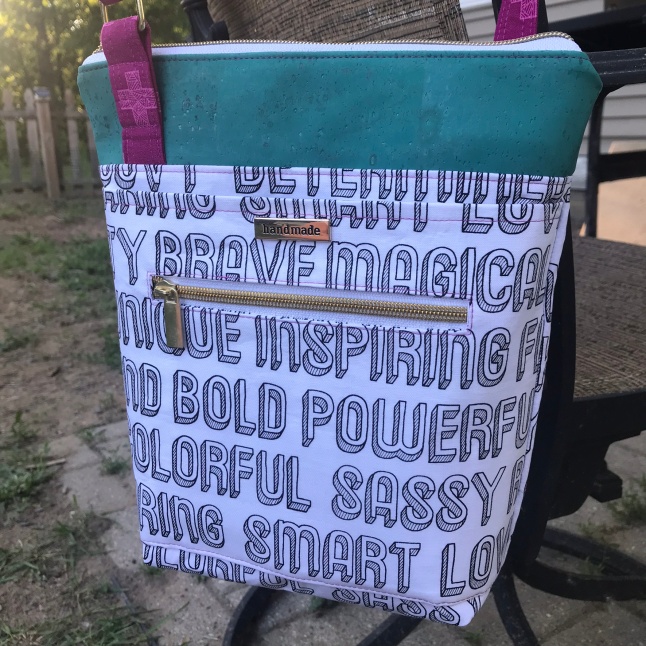
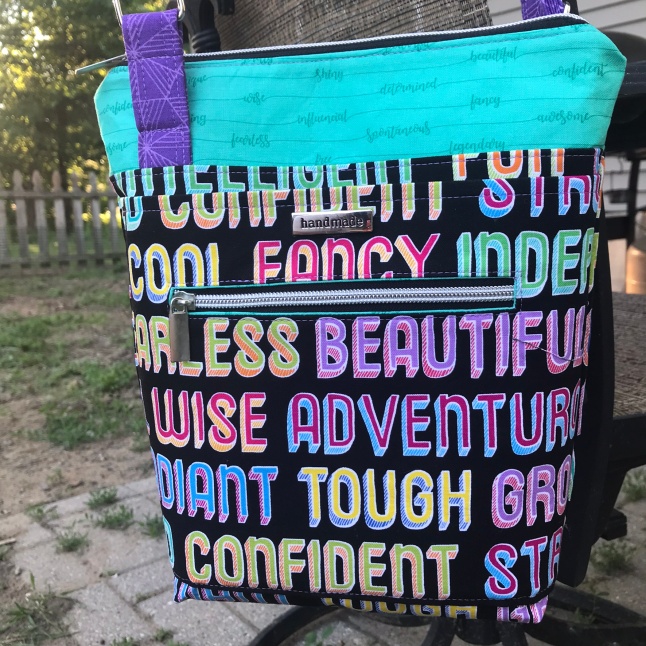
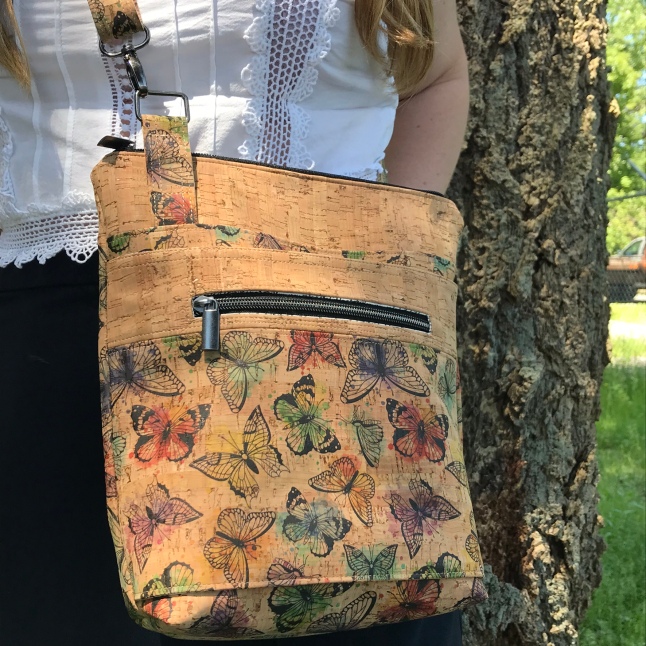
It’s no surprise that I love bag hardware!  I am always looking for what’s new and exciting so I can add it to my website.  I’m a bit of a bling girl myself but I know that some of you prefer something simpler as do I from time to time.  When you have that perfect piece of cork or fabric and you don’t want to cover it up but still want to add something fun to your bag, strap ends and strap keepers might be exactly what you’re looking for!  Here are my tips and tricks for using these pieces.  You can find them on my website in 6 colors!

IMG_0877

Using Strap Ends

Straps Ends are very simple to add to any of your bag handles.  They slide on and screw in place covering the end of your handle and giving it a nice finish.  Here’s a few tips that will help you out:

IMG_0301

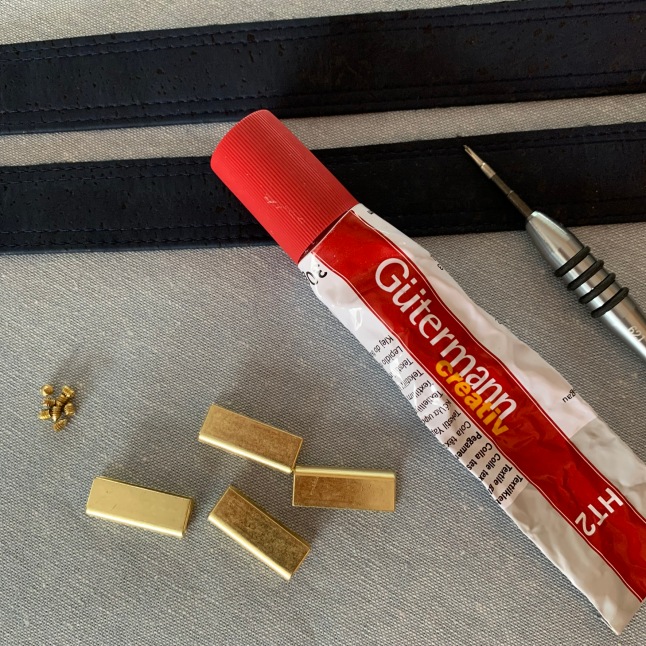
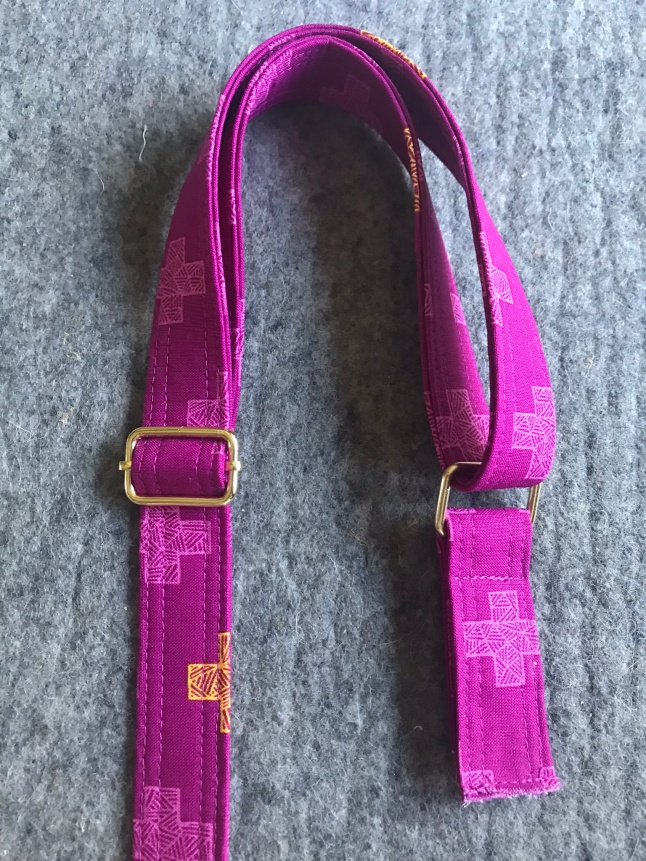
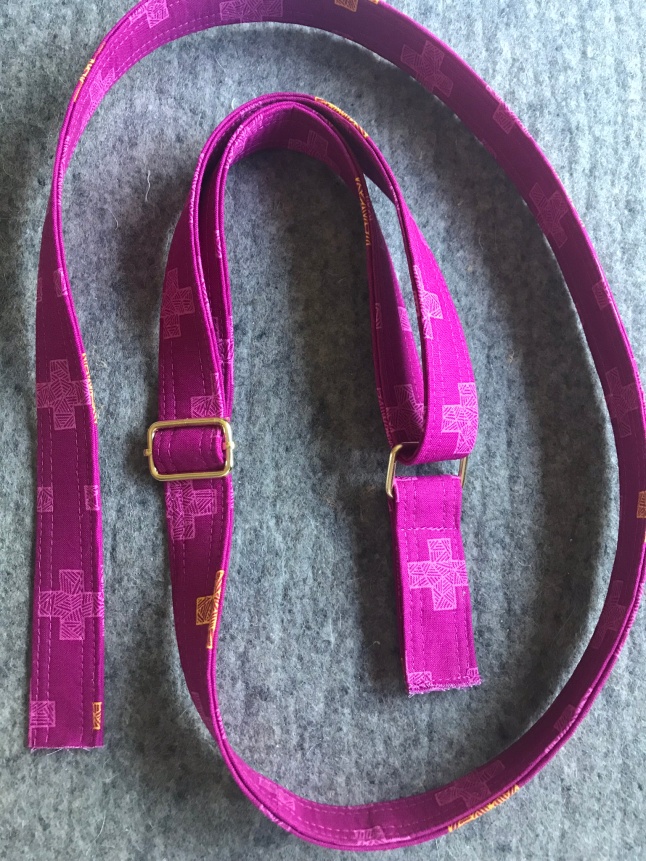
First you’ll need to complete your straps. The ends are still unfinished.  You will also need your straps ends (which come with tiny screws), a screwdriver (This is a magnetic Diva screwdriver found on the website too) and glue.  I prefer Gutermann HT2 but E6000 will also work.  Please note: If your screws don’t match exactly to the strap ends its ok because you won’t see them when you’re done.

IMG_0305

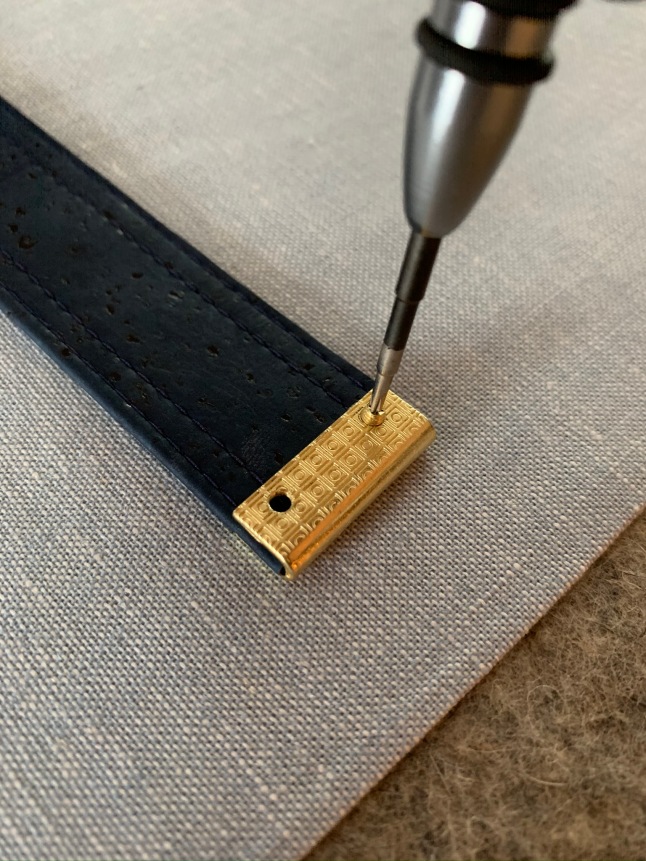
Next, add some glue in the channel of the strap end.  Slip onto the end of your strap and screw in place.  Simple right?  Here’s a tip for you: As I mentioned earlier, the screw color doesn’t matter.  In fact (in my opinion) the screws don’t really matter at all.  You can skip them completely and just use glue.  As long as you use the proper glue (see above) then your ends won’t come off.  And you won’t see the back after the next step.

Some bag makers like to use rivets or Chicago screws to hold straps down.  Those would also work just fine for this handle.  But I’m going to show you how to use the strap keepers for the final step of this bag.

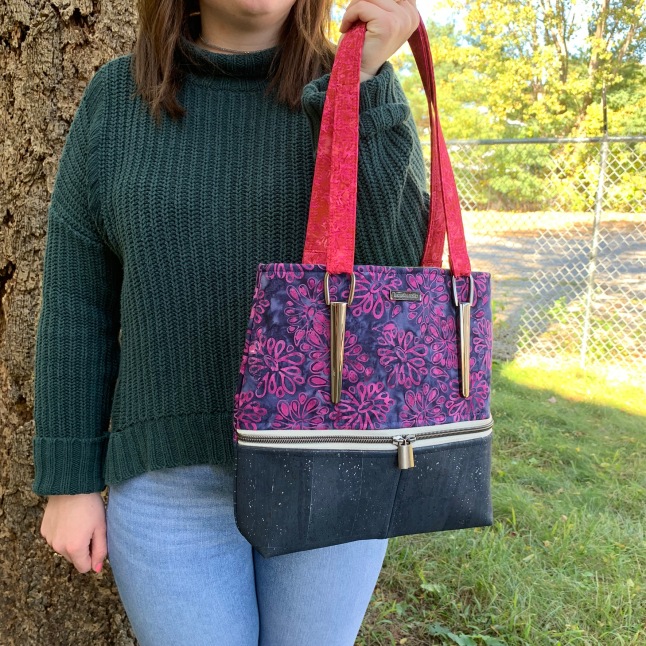
Adding Strap Keepers

Strap Keepers do exactly that – keep your straps in place – but they are actually more decorative than functional.  They are also referred to as strap bridges by some bag makers.  They’re quite easy to install too!  First you need to sew the handles to the bag front and back.

IMG_0309


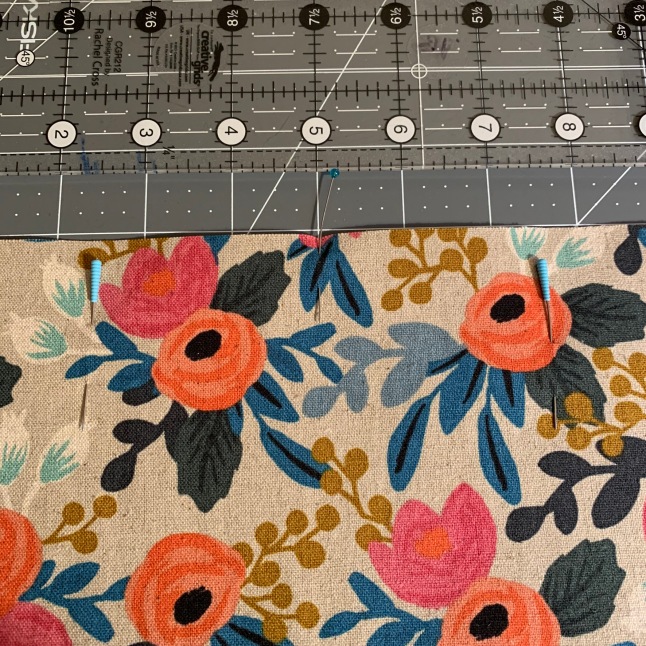
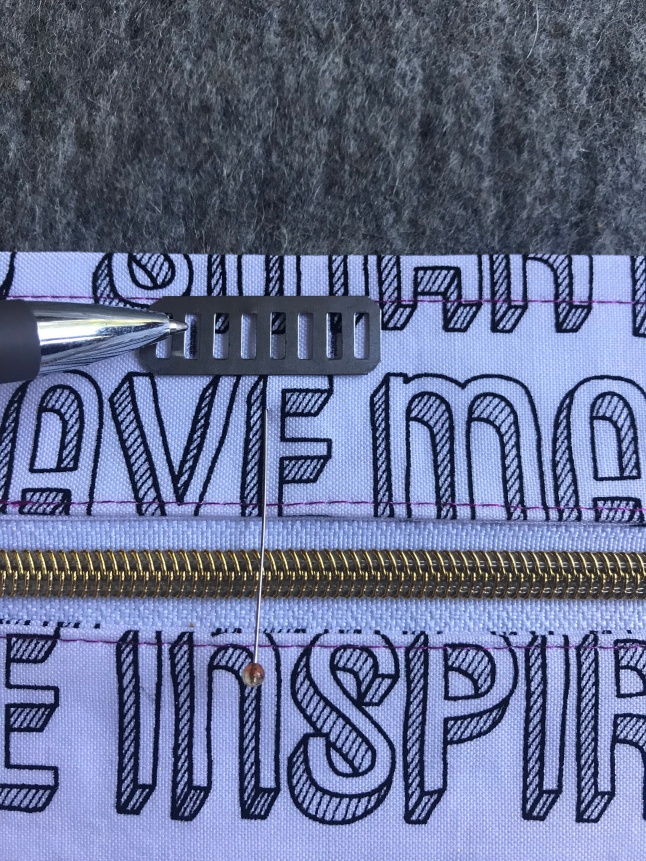
Find the center of the bag and mark with a pin.  Mark out 2.5″ on either side of the center for handles that will be 5″ apart when done.


IMG_0311


Place end of handle 3″ down from the top edge and clip in place…..


IMG_0312


Handles should be placed 5″ apart, centered.  The 5″ is measured from the inside of the handles


IMG_0313


Measure 1″ up from the bottom of handle (strap end) and mark lightly with pencil or chalk.


IMG_0314

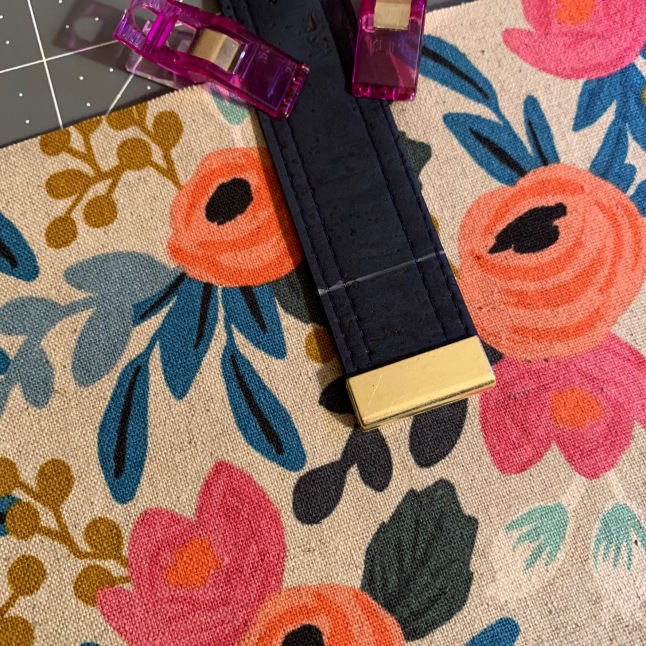
Mark both ends of handle.


IMG_0315

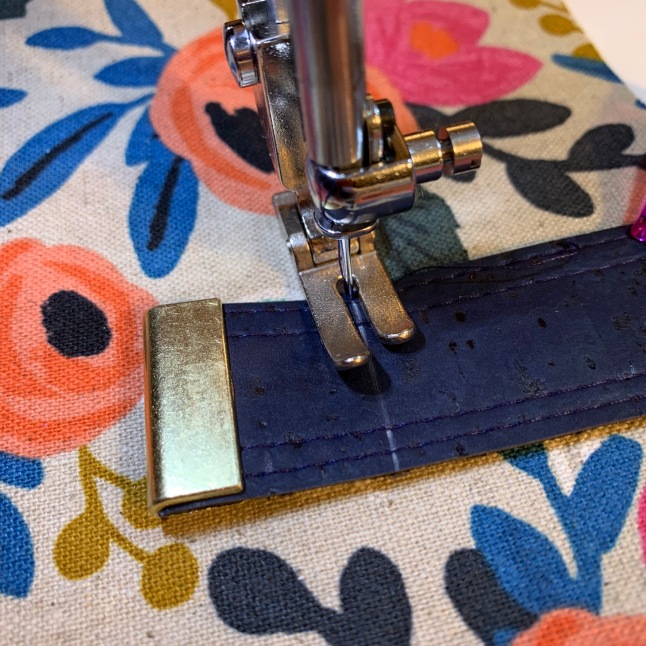
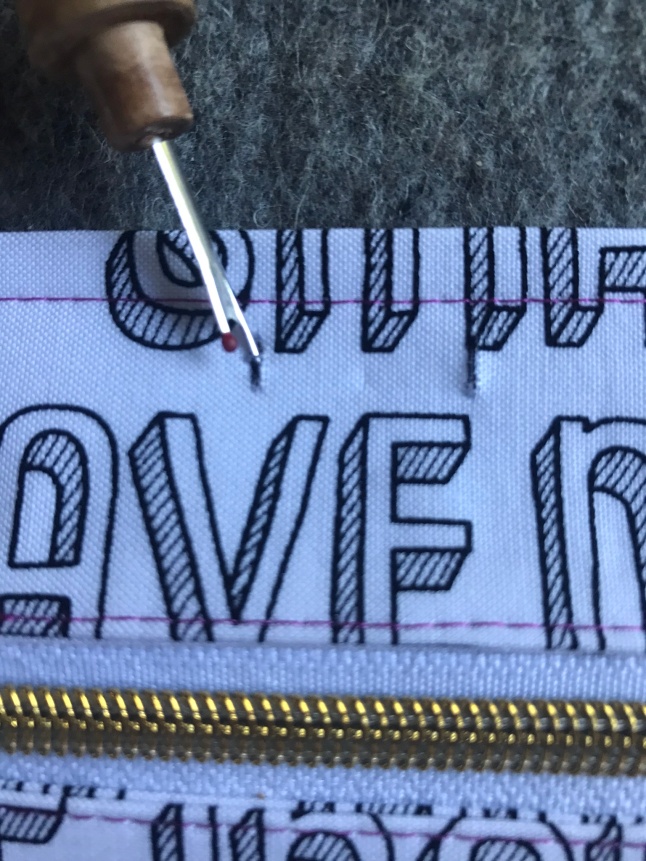
Stitch back and forth a few times to secure handle in place.  Repeat on back with second handle.


Once handles are secured to the bag front and back, the Strap Keepers will cover the stitching & keep them in place.


IMG_1603


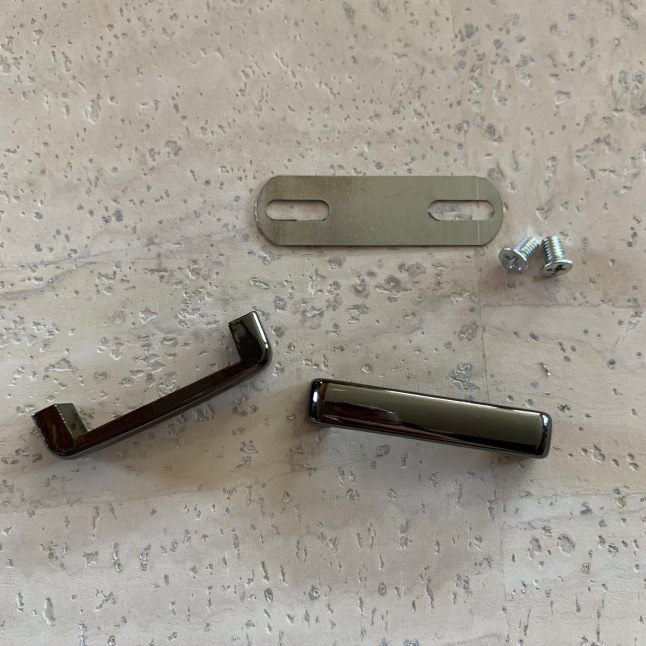
Strap Keepers (set of 4) come with washers and screws.  One set per bag.   (This is not a complete set shown)


IMG_0320
Use the washers that came with the strap keepers to mark the placement.  Place a washer 1.75″ – 1-7/8”  from top of bag and center over the stitching you just did on the handle.
IMG_0321

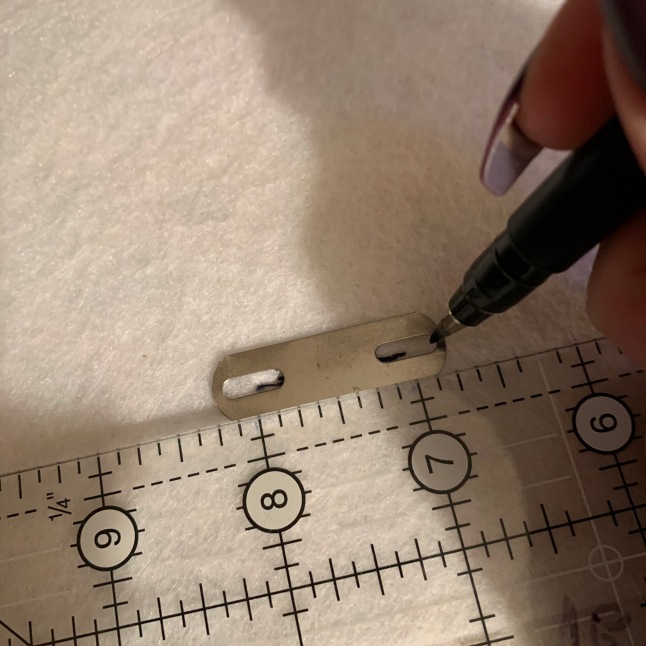
Use a pencil or pen and mark the ends of the slits in the washer


IMG_0323

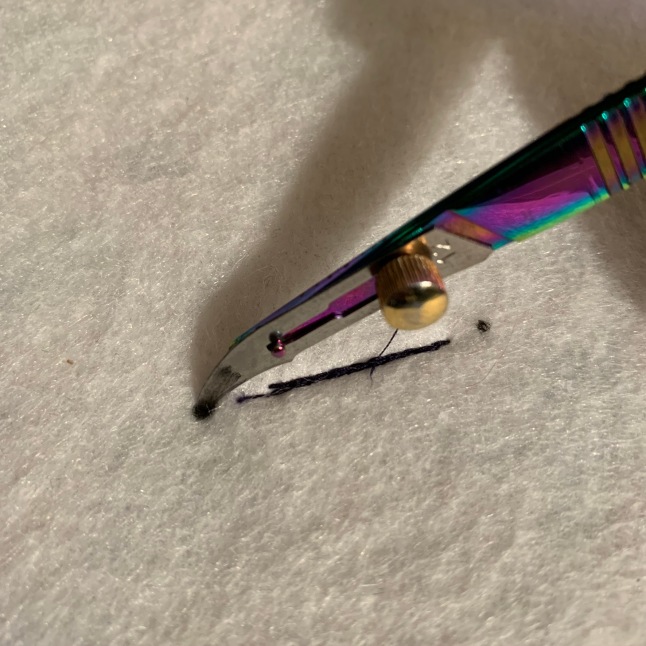
Use your seam ripper or small sharp scissors to cut a small hole on each end for the screws.  Make sure you cut all the way through to the front but don’t cut too large of a hole.


IMG_0324


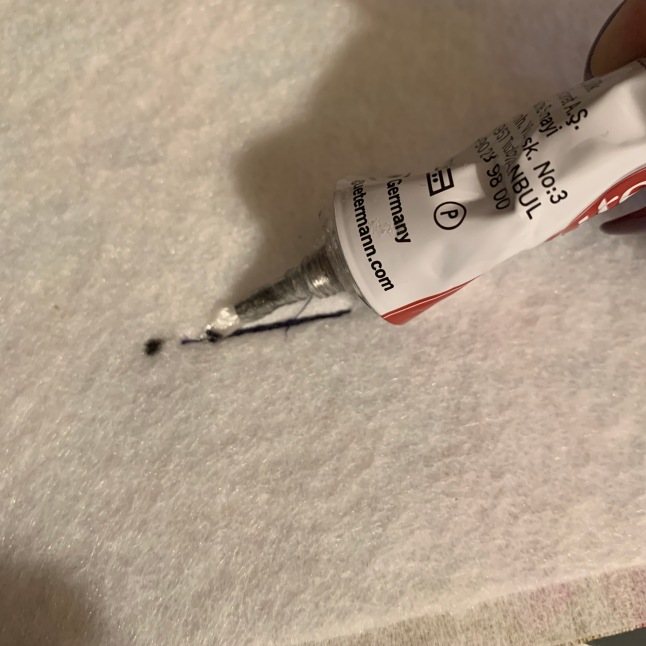
Add glue between holes, right over stitches, (for washer stability)


IMG_0325

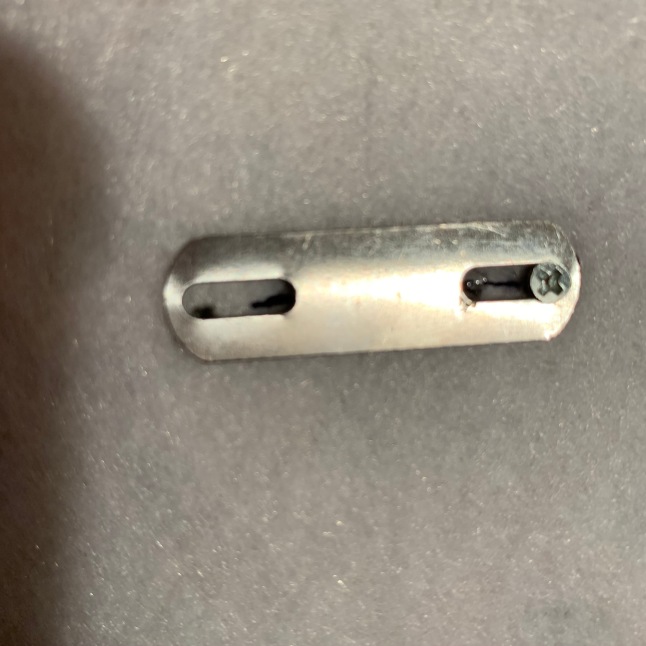
Add screws from the back, through washer, to front of bag and secure hardware in place.


IMG_1605


Gunmetal, Yellow Gold & Rainbow


IMG_1607

Note: Gunmetal and Yellow Gold strap ends have a slightly different color/finish than strap keepers.

Hope you enjoyed the tutorial!  Happy Sewing,

Jess


Kismet Blog Tour featuring the Elly Handbag

As always when my quilting friends ask if I want to make something using their new fabric line I say YES!  I am so grateful to have made such wonderful (and talented) friends in the industry.  Tammy Silvers designs fun and beautiful batiks for Island Batik and I just can’t say no to making a bag from her collections.  If you haven’t mixed batiks with cork yet then you should!  There’s something so pleasing about the combination that I just love! Below is my new Elly Handbag pattern featuring Kismet batiks, Navy with Silver Cork fabric, faux metal zippers and Icicle strap anchors in Silver.

Elly Tammy

Here’s a little about the Elly Handbag.  I was asked recently what comes first in the design process – the name, the style bag, etc…. And here’s my answer.  Elly was destined to be the name of my next bag.  As you may or may not know my names are picked from my friend’s children and grandchildren.  It gives me a unique name opportunity as well as a “secret” little shout out to my friends. Elly is my friend Lisa’s first granddaughter, with the bluest eyes I’ve seen, who couldn’t be cuter.  I knew that I would user her name.  Now onto the style.  I am always thinking (sometimes it’s a curse) and on a drive home from a show thought about something I hadn’t done before – putting a zippered pocket in the front separating the top and bottom.  Done!  And now onto hardware.  I knew we had a new color of strap anchors coming in and I like to have more than one style of bag that works with the hardware.  I knew that this bag would be great to showcase the Icicles or Jewels.  So Elly was created in that order.  Not always true of every bag, some are developed in different ways and names last.  The creative process is unique per pattern!

Below are some other Elly bags, not using Kismet but still beautiful!

The bags above feature quilting cotton, cork and even wool!


Thanks for stopping by and be sure to check out all the other blog hoppers on the Kismet tour!

Happy Sewing,

Jess


Speakeasy Blog Tour

Several years ago I met Tammy Silvers of Tamarinis  at Quilt Market.  To be honest I can’t remember exactly when or where but for the last few years I have been lucky enough to make bags from her beautiful batiks for each market.  Last spring I got to play with her Speakeasy batiks and can I just say wow!  They are so my colors!  Below are the bags I made for her and a little bit about each one.


Speakeasy

The left is the Tourist Tote bag.  A classic, simple and easy construction bag that I have made time and again.  Funny story about this bag….In 2011 after I had been writing patterns for a few months and a friend of mine who worked at a local quilt shop asked me if I could design a tote bag.  Something simple to show off a larger print.  I thought to myself, yes I can, but WHO WILL BUY THAT PATTERN?!  Don’t they giv away free tote bags where ever you go??  Yes I really thought that.  But I wrote the pattern anyway and it’s been a best seller!  Sometimes your friends just know 🙂  This version uses Grape cork with Speakeasy batiks and I just love it!

The bag to the right is the Lucy Crossbody.  I used Mustard cork with Antique Brass Hardware.  I think this one is my absolutely favorite from the collection.  Lucy has a flap pocket in the front, a zippered pocket in the back, inside divided pockets and a recessed zip closure.  It is truly the perfect size for everyday.  And I don’t know about you but I just love a crossbody bag.  As someone who is always on the go, I like having something hand free.  How about you?  What style bag do you prefer?

Thanks for joining me in this blog hop!

Happy Sewing!


good vibes only tour & central park sling

Good morning!  It’s my turn on the Good Vibes Only Fabric tour and I’m so excited to show you what I made.  I might be a little biased but I happen to think that my good friend Shayla is an amazingly talented designer (and one of the best humans I know!) but friends are allowed to feel that way right?!  And look at these words!!!  Who wouldn’t want to create something with these fabrics, am I right??

When I was invited to join the tour I didn’t hesitate for a moment in saying yes.  I had no idea what I wanted to make but I knew the fabric would be epic.  Here’s a little history on the bags I made…..

IMG_8324

As many of you may know I have a real passion for bags.  I have been designing purse, tote and bag patterns since 2011 and sewing them since around 2005/2006.  It’s crazy to think that my business has grown so much in these years from my first amateur attempts at bag making to now turning my passion into a pattern business that also includes supplies like cork, hardware and zippers.  Crazy!  I will admit that I looked at the beautiful pile of Good Vibes Only fabric for quite some time before I could choose a project.

And then it hit me – The Central Park Sling is the bag I need to make!  Here’s some history on this bag:  Originally designed in 2013, this pattern was made for an upcoming guild event I had where they asked me to design something new for them.  I don’t often do that but it had been close to a year since I had made a new bag pattern (I was focused on quilts for most of 2012).  I came up with this great crossbody bag that was perfect for everyday and travel.  The pattern was a great seller for several years until other, newer patterns began to over shadow it (that’s very common).  So on the back burner it went until this past March.  A student and friend of mine mentioned that was she was making a bunch for gifts and looking at the pattern cover I cringed a little.  No it wasn’t bad at all but my style has evolved so much over the years.  I knew it needed a face lift.  And some additions added for things like cork and alternative hardware.  So I reworked the pattern (no changes, just better format), updated the cover and tried it out of cork.  Voila!  It’s like new again!  Think of it like a digitally remastered version of the Wizard of Oz – Same great movie, better quality!

Here are the two gorgeous bags I made with the Good Vibes Only fabric – which is your favorite?

IMG_8398IMG_8405IMG_8403

A couple of tips /notes for you too (because I had to make it educational!)

For the black version I switched the zippered pocket piece (from C to E) to add some contrast around the zipper opening.  This is a great way to get a faux piping look on your pocket.  On the white version I used contrasting thread for my topstitching.  Both of these are great ways to add a little extra detail with minimal effort.  My rule of thumb for contrast stitching is this: Have I had enough coffee today to sew a nice straight line?  If not, no contrasting thread lol.

IMG_8318

Faux piping by just switching the pocket to a contrasting color? Absolutely!

IMG_8390

Contrasting thread for the win!

I also wanted to experiment with removing the swivel hook from the front of the bag.  Originally the pattern was written this way to help with the installation of the adjustable strap.  It’s a little easier to attach the strap via hook when the bag is done.  But what if I don’t have a swivel hook and just a slide set?  Below are some pics to make those adjustments too.  And the top portion was made with a 9″ x 12″ piece of cork – what a great way to play with cork!!

IMG_8384

If skipping the swivel you will make the tab as directed, add the slide as instructed and then add the tab to the long handle in place of the swivel.

IMG_8385

IMG_8387

Add tab and strap to top pieces as pattern directs making sure not to twist the handle, especially during assembly. I like to check and check again to be sure!

I also added Handmade tags to my bags – Here’s a very simple tutorial at the end for that too!  I use the washer to make my marks and my seam ripper to make the slits. Finish the outside pocket completely, including topstitching, and remember to cut through the front only.  The washer is now inside the pocket (on the interfacing) so you will not see when the bag is complete.  Fold the prongs over on top of each other

IMG_8389

Mark slits using washer.

IMG_8392

Cut with seam ripper through front only.  Be careful and cut away from topstitching.


IMG_8395

View from inside the pocket.


And just because…. here’s a pic of the all cork version I also made!  Thanks to my model Haley!  The entire outside was made from 2 pieces of cork – an 18×27 and a 9×12, including the strap!

IMG_8282

Thanks for stopping by!  I hope you enjoyed these tips and my Good Vibes Only projects!

Happy Sewing,

Jessica


wool pressing mat review


IMG_0037I recently purchased a Granny’s Perfect Press wool pressing mat from Granny’s Legacy because, well, curiosity got the best of me!  A friend had bought one in the spring during our trip to Paducah, KY and I had been thinking about it since then.  I decided I had to try it and I am SO GLAD I DID!!  It’s not often that I buy something so impulsively that I love this much.  I say it was an impulse buy even though I have been thinking about it for 4 months because my main reason for purchase was due to the fact that everyone had one except me!  I know, quite a foolish reason but isn’t that part of the fun of quilting?  I kept seeing them and I just had to try it out for myself.

I was told that the best part of the mat was the crisp, flat seams that my blocks would have when using it.  That sounds great, right?  The reason for this is that the wool mat retains the heat and therefore presses from the front and back at the same time.  I am a quilter but I am also a bag maker so my curiosity was about how this would help my bag making skills.  Would it help my bag making skills?  The short answer, yes!  I tried it out first with fusible interfacing.  I did my usual, placed the interfacing sticky side up and my fabric wrong side down.  I began pressing and found that the interfacing fused beautifully and very smoothly.

IMG_5408

But what sold me even more what the difference it made with cork. I use/sell/love/obsess over cork.  If you’ve followed me on social media or visited me at a show you know that cork is one of my biggest sellers and I make many samples with it.  I have minimal complaints about the cork but one thing that does irk me a bit is my inability to press a cork on cork seam flat.  It’s bulky like any heavy fabric and just doesn’t want to lay flat.  So I thought I’d try the mat and WOW I was blown away!  I did my best to capture the seams in the pictures below but it wasn’t easy.

IMG_5409

Front side after using the mat.

IMG_5410

Back side after pressing with the mat.

IMG_5411

Front without the mat (regular ironing board)

IMG_5412

Back side without the mat.

IMG_5417

Finished Cailey Handbag

One of the complaints that I have heard and read about the mats is that they smell ( I do use steam when I iron).  The reason is that they’re 100% wool.  They can smell a bit like a wet dog (or sheep lol) when used with steam.  Ever wash a wool sweater?  Yeah it’s that smell.  But it’s totally normal and really not as bad as some of the complaints I heard.  My solution?  I sprayed it several times with Best Press or Soak spray in a yummy smell like pineapple or peaches.  I pressed and then spritzed a little more.  Each time I used it, it got a little better.  I also bought the largest size that they had (17.5″ x 24″) so I could cover as much of my ironing board as possible.  Pick the size that makes the most sense for you!

So what are your thoughts?  Do you have one, do you love it, do you hate it?  Leave me a comment because I love to hear from you!

Happy Sewing!

Jessica


How to use Zippers by the Yard

IMG_4948

There’s been a new edition to the website that I’m thrilled to present – metal-look, nylon zippers by the yard.  You can find them here on the zipper page.  They come in 3 tape colors (Black, White, Light Gray) and 5 teeth colors (Silver, Gunmetal, Antique Brass, Gold & Rose Gold).  What I love about these is that you get the look of metal zippers (which I love) but the ease of sewing with nylon (which I love even more!).  Metal zippers are beautiful but they can be a bit intimidating if you’re new to using them.

Working with zipper by the yard is not as hard as you may think.  It’s nice because you’ll always have the size you need since you can cut them to any size needed for a project.  Below are some tips for working with them and adding the pulls.  Remember, sometimes having a third hand can be helpful so if you have an extra hand around (like a friend or spouse) that can be super helpful.  And it gets easier with practice!

IMG_5172

Each set of zipper tape (1 yard or 3 yards) comes with separate pulls – 4 per yard of tape.  Always start with a nice clean, straight end.

IMG_5174

Begin by cutting to the size needed.  I always cut about 1″ longer than needed which you’ll understand why in a couple steps.  Separate just a bit so you can add the slide.

IMG_5178

The pull has a wider end and a narrower end.  You will insert the teeth into the wider end.

IMG_5188 (1)

Begin by inserting one side of the teeth at a time, just a few teeth.  Insert a few teeth on the left and then a few on the right. You want to make sure you have the tape in the narrow ridge along the side of the pull.

IMG_5191

Place 2 fingers on the tape to hold it in place and use your other hand to slide/wiggle the pull into place.  Be patient with yourself!  This is where that third hand comes in handy 😉

IMG_5198

Once the pull is on you may see a bubble in the tape. This is caused by the teeth not being perfectly in line when the pull was added and it’s totally normal. It’s also why I cut the zipper a bit longer so I can trim it. I slide the pull all the way to the other end and then open it a bit so I can trim the end straight.

For recessed zipper purse tops you will need to close up the end so you don’t lose the pull (since you don’t have the metal stopped that you would normally have).  I used a scrap of cork to finish mine and I really like how it came out.  The zipper tape is about 1.25″ wide so I cut my cork a little wider and about double in length – 1.5″ x 2″.  I folded it over the end, clipped in place and stitched it about 1/8″ from the edge.  The cork doesn’t fray so no need to finish the edges!


IMG_5341 (1)

Cork strip cut 1.5″ x 2″

IMG_5342 (1)

Fold in half over the end and clip in place.

IMG_5344 (1)

Stitch in place approx. 1/8″ around the edges. I used my favorite Janome G foot.  With my needle in the far left position (0) I can stitch a nice 1/8″ seam with the guide.  This is what I refer to as my handle foot!  Most machines have one – look for a stitch in the ditch, edge joining or blind hem foot with a center metal guide.

IMG_5353

Voila!  A finished zipper!

I hope you enjoyed this tutorial.  Feel free to email me if you have any questions!

Happy Sewing 🙂

Jessica

jessica@sewmanycreationsny.com


Creative Spaces Blog Hop: Dealing With Tools & Rulers

I can’t believe it’s Week 6 already, can you?  This summer has been flying by and I’m partly happy (goodbye humidity, hello fall!) and partly sad (My office assistant is leaving for college).  I’ve been super busy trying to prep for shows, getting new inventory in and writing patterns.

REVISED Week Six

I decided for this final blog hop post that I’d show you my method for organizing my teaching bag since that seems to be where most of my tools and rulers live.  I also acquired a few new things this week to share too!

So for me, teaching is a big part of my business.  I travel to my local shop several times a month as well as to shows & guilds & other shops to teach.  Regardless of where I’m teaching I always like to travel with my big teaching bag.  And surprisingly no I didn’t make it!  It’s a small 31 tote that just works great for this purpose.  Someday I’ll make myself one!

I like to have my own tools so that 1. I have what I need for demoing hardware, cutting, etc… and 2. So I have the tools I prefer.  Don’t we all have favorites that we must use for each project?  I have adopted a system of using smaller zippered pouches inside of my larger bag to keep everything organized by type. I like to make zippered pouches in different shapes and sizes (great practice for sewing zippers!) and they make my bag look so pretty too!  I have a cutting tool bag that I keep rotary cutters, extra blades, scissors and seam rippers.  I have another bag with marking tools and another with extra hardware bits like screws and what not in case someone has misplaced something.  I always keep a bag of binding clips too for making bags.  This method works great for me and might be a great way for you to get your things in order for upcoming classes.  I also have room in the bag for my rulers since I only carry a few small ones with me.

IMG_5249IMG_5250IMG_5251IMG_5248IMG_5244

This week I was at my local quilt shop teaching (of course!) and I had noticed these new Stash ‘N Store tool organizers by It’s Sew Emma they had displayed.  I was intrigued and had to bring one home.  I absolutely love it!  It’s more handy than I thought it would be and I like the compact size.  It has this colored rubber top that holds your tools upright so they’re easy to grab.  It’s slim and fits right next to my machine or even on the window sill.  The slotted design isn’t big enough for a rotary cutter but it’s great for scissors, marking tools, tweezers, seam ripper and all the other essentials.  I might have to grab another for the office to keep track of all my pens and scissors there too!

IMG_5243

IMG_5245

Roxy had to check out my new toy!

IMG_5257

Ahh the pretty pic on the new English Garden fabric I also acquired this week!

One last thing that I got this week is this adorable little Clip-on lamp from the Daylight Company.  Ok, in all fairness I have had this since May when I went to Janome training but I just got the chance to take it out of the box.  It’s such a cute little light and it’s great because it’s portable!  You can clip it anywhere you like.  It has 3 brightness settings and it’s rechargeable.  Great for travel, a book lamp, extra light at a retreat or right next to the machine like I have it.  I used it tonight while I was adding some hardware to a bag since it’s been so dark and dreary today.  The arm can be moved and bent in any direction too so it’s definitely a new must have for me.  I also have the larger slim line LED lamp behind my sewing machine that I use for night sewing.

IMG_5259

Thanks again for joining me on my journey to get organized.  I hope you learned something along the way.  I have received so many comments from each of you, some to commiserate and some with great tips that I really enjoyed.

Happy Sewing 🙂

Jessica


Creative Spaces Blog Hop: Dealing with Embellishments, Buttons & Thread

REVISED Week Five

Let’s talk about dealing with all those little things that take up lots of space – Embellishments!  As you saw earlier (Week 3 mostly) the types of embellishments I work with mostly are for bags.  Things like frames, strap anchors, magnets, etc…  And since I sell items like these on my website I buy in bulk and use my large bins and drawers for those.  For smaller items, things I use for myself personally, I like these smaller drawer units that I found at Michaels.  They’re pretty and see through and great for organizing small things like buttons, etc…  Plus the drawers tip forward for easy in and out and I like that.  This unit also has a small footprint so it doesn’t take up much space on the end of my cutting table.

IMG_5153

Right next to this unit I keep a couple small round tins with my Sharpie markers organized by color.  These are great for embellishing all sorts of things (including the tins they’re in!).  Does rainbow order make anyone else this happy?

IMG_5155

One of my favorite embellishments is ribbon.  I especially love Renaissance Ribbons.  They work with artists like Tula Pink, Amy Butler and Jessica Jones to create these amazing designs.  I use them on all sorts of bags and of course I can’t throw out a single bit!  When I have large amounts I keep them on the spools and store in baskets.  For the smaller pieces I like to wrap them on cardboard scraps (I use shipping boxes from the post office after I receive a package).  I wrap them up and pin the ends.  Simple and easy to store in a basket or bin.

IMG_5150IMG_5152

And of course we already talked a little but about thread.  I shared this pic during week 3 but thought I’d share it again because it’s just so pretty 🙂 I just can’t get enough Aurifil!!

IMG_4966

So what kind of embellishments are your favorite?  What are you currently collecting?

Thanks for joining in.  Next week is the last week of the Creative Spaces Blog Hop – Can you believe it?  I definitely can’t!  I’m hoping to continue posting weekly so if you have any ideas or suggestions for upcoming posts, feel free to leave in the comments!

Happy Sewing!


Creative Spaces Blog Hop Week 4: Dealing with Fabric & Scraps

REVISED Week Four

So if you’ve been following along for the past 4 weeks you probably have learned some things about me: My sewing area is tiny, my organizational skills are (slightly) lacking and I LOVE fabric!  So that being said I only have a few tips to share with you but for me they’re key to my happiness.  Well happiness in my sewing area anyway 🙂

I already mentioned a couple posts back that I like to leave my thread on display.  Same goes for my fabric.  I love to have my fabric out on display.  I like to look at it, pet it and be inspired by it as much as possible.  Plus it reminds me of what I already own lol.  Sometimes fabric speaks to me and tells me what it needs to be made into.  Not in a creepy Norman Bates way but more of a “psst, hey, I’d make a great bag!”.  so I like to look at it often.

Now maybe this next part comes from being a pattern designer and being trained to work within a fabric  line.  Maybe it’s just my brain’s way of organizing. I don’t know.  I  like to keep things in order by collection or designer.  This isn’t always true (I mix batiks and random pieces that don’t have mates) but most of the time I like to keep collections/designers together.  It’s easier for me when I start a project to know that all of the Tula Pink or all of the Kate Spain is together.  Here’s a few examples of those collections & baskets.  Oh and I LOVE baskets.  All kinds, any kind, I must have them all.  I love, love, love baskets!  You’ll see more baskets as we go on!

tula

A basket of Tula Pink….This is just the beginning.  And this is mostly the old stuff.  I started buying larger quantities as my love for her fabric grew!

fab-shelf.jpg

One of the misc. shelves – batiks on the bottom grouped by color.  Top shelf is the odds and ends and leftover from projects and ends of bolts.


IMG_5092

More Tula – De La Luna – Pulled for a project


IMG_5091

My first fabric line with Windham due out this fall – Gypsy – I definitely photograph and pet this fabric a lot.  Like a lot a lot.

IMG_5085

Foundation by my sweet friend Shayla Wolfe

The next tip that works well for me is to keep my fabric the same size when folded.  I try to fold everything exactly the same from fat quarters to yards and everything in between.   By maintaining a consistent size I can fit more in a basket or on a shelf. And it looks neater.  Obviously FQ’s are smaller than yards but anything 1 yard+ I fold to get the same width when done.  Does that make sense?  The second pic above has various sized fabrics ranging from 1-5 yards but I folded them all to be the same width.  The pics below are mostly from shows but this consistent folding technique works great for that too.  I have to pack everything in certain size boxes and display on shelves so if I keep the folds the same it all looks much better 🙂  Plus it’s easier to tell the difference between a FQ and a yard by the way they’re folded.

IMG_5093

Consistent folds!

IMG_5094

All the yards and all the FQ’s are folded the same.  Makes packing a breeze!

I mentioned my love of baskets right?  Here are a few that I made which also works great for storage of scraps.

img_5083.png

Notice the various (messy) baskets in the background?  Those are filled with 1 yard cuts and organized by designer.  I found them at Michael’s (I believe) and they are the perfect width for my 1 yard fabric folds.  The baskets in the front are from my Store It pattern and hold lots of fabrics!

So when it comes to scraps I have to admit something – I don’t like saving them.  I know, some of you are mad.  Some of you don’t like me anymore and I get it.  But I’m just not a scrappy kind of quilter.  I don’t do scrap quilts or make tiny things that need scraps.  There are some exceptions, mainly Tula.  I can’t even think about throwing out even the smallest piece of her fabric.  But everything else is pretty much a goner.  I find that my hoarder tendencies come out more when I have small scraps and I start justifying why I should save small 2″ squares of fabric and next thing I know I’m overwhelmed by the tiny pieces.  So I have to toss them for my own metal health.  Usually I donate them to someone locally who makes dog beds for shelters so I don’t feel horrible about not saving them.  BUT (there’s always a but with me) I do have a few other exceptions.  First of all when I’m making a quilt or prepping for market I don’t throw anything out until I’m 100% sure that I’m done.  If I need a small piece to finish a project or decide at the last minute to make one last project for quilt market (which always happens) I’m prepared.  I like to save everything in a zip lock bag labeled with the fabric name and/or project. Also a great way to organize projects when you’re on multiple ones at once.

IMG_5081

Last fall before market I was making something using Foundation from Windham fabrics.  I saved this bag until I was done.  I had also overcut the amount of pieces needed so I could pick and choose as I went along.

Exception number 2 – Cork.  I never throw any cork out unless it’s completely unusable.  First we cut from the rolls, then I cut any leftovers into sellable pieces.  Then comes 1″ – 3″ wide strips for handles and 4″ x 5″ rectangles for demos and cork tassels.  Lastly is anything 1″ or larger that I can use for the girls in the office to identify colors.

IMG_5082

A bag of 1″ strips ready to be cut into handles.

cork 2

Rectangles for show demos and cork tassels.  Again, cutting things into the same size makes organizing so much easier and neater!

So how do you like to organize?  By designer?  By color?  In baskets or on shelves?  Share your tips in the comments so I can learn from you too!

Happy Sewing!

Jess


Creative Spaces Blog Hop Week 3: Organizing Tips

REVISED Week Three

I like to think that I’m organized.  Generally speaking I’m not and could use some extra help but hey it’s the thought that counts right?  😉  One of the areas that I need to be organized in is my office.  We ship dozens of packages each day, hundreds each month, plus I travel quite often for shows – at least once a month – and teach quite often.  So I need my office to be organized.  Many days it gets messy because it seems like we’re always in a hurry to get work done.  But I have found some great things that work for me and hopefully will inspire you to reorganize your space too.  Ready for a glimpse into my other work space?  Here’s my office!

Tip #1 –  Get the right shelving & the right size containers

Yes I am storing massive amounts of hardware & cork BUT that doesn’t mean this won’t apply to your space.  The right shelving will help to not only organize your space but will also be strong enough to hold the weight of whatever items you need to organize. For me personally, I love these metal racks from Home Depot and I use them in various sizes and heights.  Remember, fabric is heavy. The same goes with the purse hardware I carry and even cork fabric.  I store folded cork on the top shelves with stackable containers in the middle.  I used to use lighter weight laminate shelving but you do get what you pay for.  The small white shelves looked so pretty….until they started to bow!  Plus the backs would always pop off.  That doesn’t look nice.  Maybe a different shelf works for you in your space – check the weight limits before you buy.  My friend Barb who’s a long arm quilter also loves these particular shelves for organizing customer quilts.

The containers that I use are also from Home Depot.  They’re lower in the front making it easier to get things in and out.  They’re also stackable.  I think they’re actually made for nails, screws, etc… For us in the office they work great.  Everything is unboxed, labeled and ready to grab for orders.  This helps tremendously when you can see what you have.  Imagine also using this system for thread, zippers, bobbins, organizing notions – whatever you need!  I have a few of these at home on my dining room table by the cutting mat for rotary cutters, blades, scissors, etc.

IMG_4915

Tip #2 – Overflow in closed containers

We get so much inventory that we often have overflow.  Clear plastic containers are perfect for the bottom row of the shelves.  Think about those items that you don’t use every day but need close by.  Maybe extra rulers, marking tools, extra fabric, or those great sale items you pick up that you know you’ll need someday (whenever someday comes)  And of course – label those bins!

IMG_4916

Tip #3 – Plastic Drawers

I love these plastic drawers.  You can remove the drawers to carry items to different parts of your studio and still see through them.  Pretty awesome right?  And they work for lots of other areas as well.  I have a couple small sets of these at home for my makeup so it’s not just a sewing organizing piece.  I found these on Amazon.  I also have a large rolling drawer bin under my cutting table at the office for misc. items like works in progress & color cards.  Things I need sometimes but not every single day.

IMG_4918

Tip #4 – Let it all hang out!

Well, let some of it hang out.  I love fabric.  And thread.  And notions.  And makeup.  And cookies.  Oooh cookies.  Focus, Jessica. I never put my thread away.  I did have some of those wooden spool racks and I loved those.  I used to have them hanging on either side of my sewing machine in the old studio since I sewed in a little alcove.  Now that I’ve downsized (See post 1) I have limited space.  So I like to store my thread in a fabric bowl that I made.  It brings me joy and adds some bright color to my space plus it’s all there for me to see.  What I’m saying is, don’t put everything away.  Keep it neat but leave something out that inspires you and makes you smile.  Side note: I use another much larger fabric bowl I made for dog toys!  I keep trying to train the dogs to put the toys away but some battles can’t be won.

IMG_4966

Tip #5 – Keep the good stuff close and remember anything can be a container

To the right of my machine is where I keep all the essentials – scissors, seam ripper, binding clips, glue, pins, etc…And each item has a spot.  That’s how I attempt to keep my living room looking nice and make it easier for me so I’m not digging around for something when I need it.  I use coffee mugs for sharp tools & pens (from fun places I visit), magnetic dishes for pins (Can’t live without & the dogs can’t knock the pins over), and pretty metal cups I pick up from craft stores like Michael’s for misc. items.  I also use this system for my teaching bag that you will often see me carrying at shows or shops when I have a class.  Each item has a zippered bag all stored within a larger bag.  Again, it’s pretty AND organized.  And I can grab it when I have a class and I’m out the door!

IMG_4968

I hope that some of my tips will work for you.  Or maybe you just enjoyed the brief tour of my office.  Is there anything I missed?  Something else I can share with you?  Or maybe you have a great organizing tip for me?  Please feel free to leave a comment!  I’m always looking for other blog post ideas so I want to know what you want to see!

Happy Sewing 🙂

Jess